World First : The LEGO Wheelchair

So here is a prototype of my latest project, the LEGO Wheelchair which is capable of moving a 90KG person around a room using just LEGO Mindstorms, LEGO Technic and Rotacaster multi-directional wheels.  This is still a prototype and under constant development however I really wanted to let people see what I have been up to.

My wife giving version 0.8 a test drive.

Me having an initial go on version 0.5.

The lastest version uses 6 LEGO Mindstorms NXT’s for moving and 1 NXT(master) for controling the direction.  Each of the driving NXT’s has 2 NXT motors attached to it and 2 touch sensors used to control direction.  The master NXT has 4 touch sensors connected (forward, back, left and right) and 2 motors to switch on the drive touch sensors.  It is programmed in RobotC.

One of the next things on the list is to add remote control to the wheelchair using an Android device.  The chair is controlled via 1 NXT, this will be very straight forward to control via bluettooth.

Flickr stream

Special thanks goes to LEGO and Rotacaster for supporting this project!


Mindstorms NXT and Trains

At the start of June there is a small LEGO railway show at the Buckinghamshire Railway Centre.  The first year I went I did a display of LEGO pneumatic engines which I really enjoyed building.  This year I have decided to bite the bullet and do something train related!  Dont worry, I am not going to the dark side.

Below is a  simple train demo which uses the LEGO Mindstorms NXT to control 2 9volt trains.  I actually really enjoyed creating this, all I need to do now is actually make some trains!

This has been programmed in RobotC and uses 2 light sensors and 2 touch sensors to detect and stop the train.  NXT motor port A powers the main track loop.  NXT motor port B and C power the part of the track that comes off the points as they are isolated.  So if NXT motor port A & B are on, train 1 will move. If NXT motor port A & C are on, train 2 moves.

Please let me know if you would like further information.


Mindsensors RCX Multiplexer controlled via Android and RobotC

As you may be aware I have been building a Robot called Wheeler out of old parts (old grey and RCX 9V motors etc).  I was hoping to have it finished over the Christmas break but had hit a small issue with driving the wheels with the new weight of the body.  Anyway what I managed to get up and running is the top half of Wheeer and the controller which is a Android phone (Dell Streak).

Mindsensors RCX Multiplexer

I was utterly impressed with the Mindsensors.com RCX Multiplexer and using Xanders driver suite (check BotBench) how fast I was up and running.  I wish there was a way to run the RCX Multiplexer off the NXT power supply but thats a small thing compared to how useful it is.  I wish I had 3 more of them so that I could control 16 RCX motors!

Android NXT Remote Control

So to try and work out how to control the NXT via Android, I stumbled across the NXT Remote Control project which is free to download.  This uses Lego’s Direct Commands to control the 3 motor ports on the NXT.  This means it bypasses your own code and you have no control over it.  However, what I managed to do is reduce it down to a very simple program that sends messages to the NXT which you can deal with in your own program.  In RobotC, it sends messages that are compatible with the MessageParam command and so you can send a message ID and 2 params to the NXT and deal with them in RobotC anyway you want to.

Code will be available soon once I have tidied it up 🙂


Lego NXT Robotic Arm

Today I had a little bit of spare time while looking after my son and watching some films, so I decided to try and build a studless (I always build studded) robotic arm using NXT motors (I mostly use PF).

Here is the result.

I have to be honest and admit that I loved building using studless Lego.  It does involve building in a different type of way, you could say in a more structured / planned way.  However until I have enough of it to build giant robots, I will be sticking with studded Lego which I have tons of!

I still need to spend some more time with the NXT motors as they still feel very alien to use due to their random fitment and shape but I am sure I will master them soon.

Merry Christmas everyone and have a great New Years!


Building Big, Bigger, Biggest!

While building George (and Bob) I learned quite a few things about building big moving Lego models. Don’t worry, I still have plenty to learn however I try to give quite a bit more thought to a project before I start prototyping and testing things out.

The main issue I always face is how do you make a huge model move! Now George and Bob both struggled on non slip carpets, however most surfaces were not a problem for them. As I plan to make my next project a lot bigger than the last 2, I instantly hit issues. Both George and Bob were quite thin models with a main long beam. George had a height of 5ft 7in. They both probably weigh between 20 and 25KG each.  So imagine building something 6-8ft tall, with a main body 2 times fatter than George and a horizontal arm beam of around a meter long with a model of a mini gun on each end. Once built, if this things weighs less than 40KG I would be impressed!

For this next project I have given a lot of thought to the weight / moving issue. I have researched a few different options and the first one I hope to prototype is using Rotacaster omni-direction wheels to take the pressure off the tracks.  These wheels can basically move in any direction and support up to 25kg per wheel!

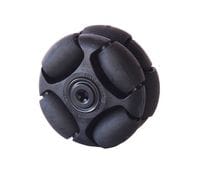
Currently the omni-direction wheels only come in 48mm size which is a little small to use as the main platform, however if I keep with the normal track design but place these wheels behind the track to support the main body, which is the heavy part of the model, then the resistance on the tracks will be less and should then have an easier job moving the robot.

Lately I have also been investigating Lego compatible metal axles. Trying to transfer the power from several XL motors to the robots tracks is actually quite hard work because the motors are strong enough to twist plastic axles and snap cogs.  They can also bend quite a bit when used as axles for the wheels / sprockets as they are supporting quite bit of weight. Metal axles would cut down on issues but could damage the plastic. I do hope to get hold of a few to test out and review. If anyone else is interested in metal axles and cogs that are compatible with Lego, then check out the Bricklink store Brick Machine Shop.

Another big issue for building large models is the cost of parts! Most Lego technic sets have maybe 10-15 large Technic beams in it. They might have 1, 2 or even 4 motors. When you start planning to build a large technic model, you’re looking at 10+ motors and thousands of beams! Also as everything is further apart, you need to invest in quite a few extension cables for the motors and they aren’t cheap. Lately I have even run out of Technic pins!! The last couple of models I have built used the Lego Starwars Hailfire Droid with wheels from set 4481 as a main bearing. These wheels only exist in this set (pretty rare) and cost over £20 per wheel to buy from Bricklink.

A few ways I have gone about keeping costs down is by parting out my sets and using them. A few years ago, I didn’t build but only collected sets. It was when I had to build something for a show that I did then switch over to building instead of collecting. I have now decided after many years to start integrating my sets into the stuff I use to build. Any rare sets I keep separate. I also asked on the Lego forums (e.g Brickish) for parts that people might have spare. A few people have been very generous to the cause! Generally I don’t need brick and non Technic parts and so I can use these parts to swap for bits I need.

Say hello to George (v1 – 2.1)

After Bob, I decided to adapt the KISS approach (Keep it simple stupid)!  My objective for the Great Western Lego Show 2011 was to make a Robot that worked, and worked well!  It had to move and be able to turn on anti-slip carpet, easy to control and be strong enough to take knocks / drive in to tables without breaking.
George is a fully functional 5 foot 7″ robot. Controlled via a PlayStation 2 controller, he can move about, rotate his upper body, move his arms / shoulders and grab items. His head also rotates, moves up and down and if you get too close, his eyes will roll.
More pictures can be found here:

Communications
This time around I decided to scrap having multiple NXT’s and went with the brilliant Mindsensors wireless Playstation 2 controller sensor pack. This allows you to control your NXT via a Playstation 2 controller which has a huge number of buttons / controls on it.  Then I linked the NXT to a hiTechnic IR link so that the NXT could send commands to power functions infrared receivers (all 4 channels). This setup gave me a large number of possible functions (11 different motor channels). I used RobotC to program the NXT as I find it an amazing programming language.

Weight
This robot had a large upright body beam. However it did not rise up and down so it did not require any counter balance weight. Also, it was not plated and only carried 1 NXT. This probably cut down a 3rd of the total weight of the robot, even though it was bigger than Bob (5 ft 7” tall).

Drive
The main base of the robot was smaller than the one on the previous robot which would naturally make it move a little easier, especially being lighter. Also the 4 XL motor driving it were geared down via a 8 to 24 tooth gearing. First time around, this just snapped the gears in half. The way to get around this was to use 2 sets of 8 to 24 tooth gears in parallel on the same axle per motor. Also, as a backup, in case the robot did not work on the show carpet, I could swap the 24 tooth gears for 40 tooth gears very easily which would give it even more driving power but at a cost to speed.

On the day
George was a huge success with the members of the public. Most people did not realise it moved and so jumped quite a bit when they realised it did. This was very funny except for the odd small child that got rather scared. People even started taking pictures next to it and a few people felt compelled to try to hug it or shake George’s robotic hand.

Issues
Issues were a minimum really.  After transporting George in more pieces than I hoped, I had to do a small tweak to the neck as the gears were slipping. Sadly I only had red technic with me for another one of my models and so it looked a little odd if you saw George from behind.

The main body bearing, as shown below just did not work on the day (well 2 days).  I am not sure why it worked at home and then stopped but I could only get it to turn 1 way.  Also the footballs kept falling out! I have since swapped them out and made a better version using wheels.

The only other issue which, to be fair, I already knew about, were that the large linear actuators (x3) in each shoulder joint made horrible noises (the built in clutches) and sometimes got jammed. Lego have made improvements to these actuators, but I have not got the newer version yet. I did try using pneumatics for the shoulder but that gives you little control.

The Future
I have already started work on 2 more large robots for next year (while also keeping George).  The first will be called Wheeler and is a giant wheeled robot. The start of it can be seen below.

The second robot will be based on Bob (T1) but avoiding all of the downfalls of it. I am looking forward to seeing people’s faces when there are 3 giant robots running around.


It started with BOB (T1 v1)

One of the robots that really fascinated me that I thought I could build was a T1 from Terminator 3.  It was a tracked robot with twin mini-guns (another thing I wanted to build).  So I went about building a rather large Lego version for the 2010 Great Western Lego Show which is our club’s (Brickish) largest event.
My first giant robot based on T1
More pictures can be found here:
Bob Flickr Stream
Bob suffered from a few major issues.

Weight
Due to its weight (well over 20KG) it could only turn on low friction floors.  The base of it was nearly a meter square running double tracks each side powered by 4 XL motors (directly linked to sprockets). Going forward was very quick but turning just did not work well. I only actually found this out on the day of the show where I discovered the floor was anti-slip carpet.

Communications.
The robot had very clever communications in my opinion. It used 4 NXT’s (2 slave, 2 master)  which communicated via bluetooth. One set of NXT’s had an accelerometer which when moved, would move one of the robots arms so that it would mimic the users moments. The other set of NXT’s also had an accelerometer to control the other arm however it also had a mode button so that you could control the robot’s other functions (moving, body rotation and lift, head movement) via the same accelerometer but in different modes. Each master NXT also had a fire button to fire the Zamor launchers on each arm.
The problem was that the bluetooth communication just was not stable enough and also suffered from lag and loss of data. You would put it in arm movement mode and it would instead move the tracks. There there would be a large amount of lag which meant the robot was always a few seconds behind. In practice, this caused the robot to drive itself in to a table 30 minutes after the show opened causing a partial rebuild in front of many people!  Quite embarrassing.

The robot also had a large main body beam (around 4ft long) that had to be counter balanced via many boat/train weights which caused even more weight issues. This main beam actually snapped a few technic beams while it was being built. The main beam could rise up via 5 pneumatic rams. However it required over 30psi to start it off (see below). This caused other issues.

I also completely covered Bob in black plate, which had a habit of falling off and also added more weight.